Teapots have achieved a spiritual and mystical status with tea drinkers and china collectors alike. If your favorite teapot cracks or develops a leak or, if an antique teapot gets chipped, don’t worry – we have the answer:
Functional teapots with leaks or cracked lids can be repaired with non-toxic glues like DAP and damaged spouts can be protected by silicone sleeves. Antique teapots, serving only as display items, can be made as good as new using epoxy adhesives and standard china repairing methods shown below.
Repairing broken china teapots
China teapots are fragile items, especially when used on a daily basis to serve fine tea. The most common areas of damage are:
- Chips or damage to the spout
- Broken or missing handles
- Broken or missing lids
- Cracked bowl resulting in leaks
As an Amazon Associate, I earn from qualifying purchases.
How to repair chips in a teapot spout
The spout is the most vulnerable of all parts of a teapot, in fact, the finer the china, the more delicate the spout, and the more likely it is to get damaged. Fortunately, there are simple ways to fix a chipped spout.
Roughen and clean the chip, mix 2-part epoxy adhesive and tint it to match the china. Apply the epoxy to the chip and allow it to dry overnight. Finally, sand and smooth the epoxy and varnish ready for use.
Protection for delicate teapot spouts
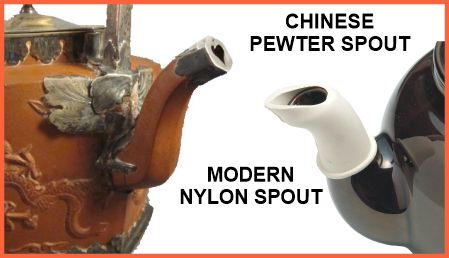
The vulnerability of spouts was well known to the ancients, and Chinese artisans met this challenge in a typically ingenious way by making the ends of the spouts out of metal. The modern solution is to protect the tip with a nylon sleeve – which also improves the pouring characteristics in those annoying teapots that drip and dribble.
Step-by-step repair instructions for chips in a teapot spout
If you are unfortunate enough to chip your favorite teapot spout and really want to continue to use it: follow the steps below for a simple and effective at-home repair.
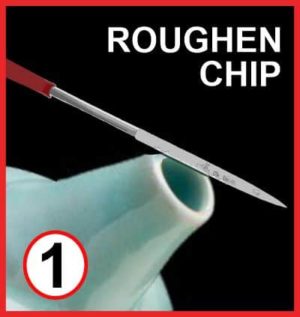
1: Taking care not to damage the spout further, use a small file or fine sandpaper to slightly roughen the chipped area so that the glue will adhere to the china.
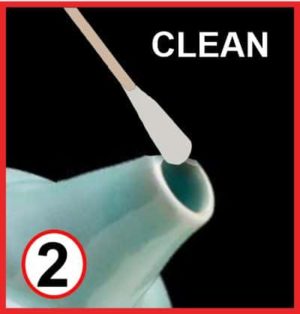
2: Carefully clean the chip using a Q-tip with denatured alcohol or similar (Alcohol evaporates without leaving a residue).
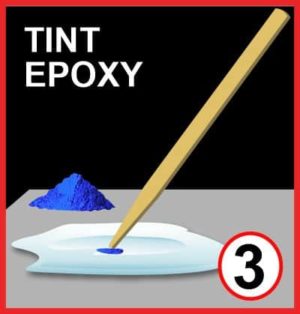
3: Mix 2-part, clear epoxy adhesive with small amounts of colored dry pigment until the glue matches the color of the china. Too much pigment will weaken the glue. If you don’t have pigment you can use shavings from artists’ colored pastel chalks.

4: Using a cocktail stick, drip the tinted epoxy onto the spout using just enough to fill the chip. Depending on the epoxy, you have 3 to 4 minutes to carefully manipulate the level of the viscous glue until it hardens.

5: The idea is to dribble just enough epoxy to fill the chip entirely but not to overdo it because excess glue means more sanding. Then leave the epoxy to set up and cure overnight (you can accelerate the curing by putting the teapot into a warm (150 degrees F) oven).

6: After the glue has cured, examine the result to see if another layer of epoxy is required. If not, carefully sand the epoxy down level with the spout. You can use 400 grit followed by 600 grit sandpaper, or even a sanding nail file that you may have available.

7: Add a dab of paint if the color does not match exactly and, to increase the glossiness and seal in the epoxy, you can brush a little clear nail polish over the chip or spray the tip with clear gloss varnish.

8: If done carefully this repair will successfully disguise the unsightly chip in your antique china teapot and will also be strong enough to be used for your daily cuppa (but don’t use abrasive cleaners on the repaired area).
How to fix a broken teapot handle
Handles are a very vulnerable part of a fine china teapot and are often broken or even missing. Do not despair – a successful home repair is within the scope of most handy tea-lovers:
If the handle is broken into several pieces it can be put together with 2-part epoxy. If the handle is missing, the best way is to use epoxy putty, tinted to match the china, and molded onto a custom wire armature bent to follow the shape of the original handle.
Broken handle with pieces available
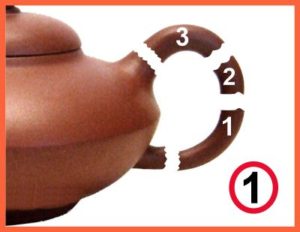
If the handle is broken into several pieces it is best to proceed in stages. Remember, most amateurs use far too much glue! See this link for advice on gluing.

Glue two of the smaller pieces first using a small amount of epoxy on one side of each join. Rest the pieces in plasticine or similar support so the pieces balance.
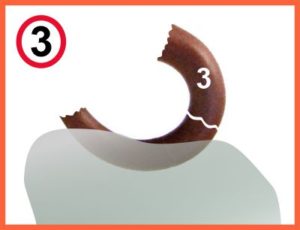
Balance the second two pieces in plasticine or similar support and apply epoxy to one of the surfaces. If you have not used too much glue the final piece will fit perfectly!
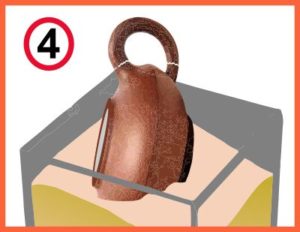
Glue the compound piece of the handle onto the teapot using a sandbox or similar support system to allow gravity to hold the top piece in place.
Examine the result carefully for small imperfections. Minor chips can be filled using the tinted epoxy method described above. Occasionally, painting is required and is described following this link. If the handle is busted into multiple pieces or you lack the confidence to tackle this gluing job – please contact the friendly professionals at Artistry in Glass.
Making a new teapot handle
If the handle is missing completely it is possible to make a very strong replacement using a stiff wire armature covered by epoxy putty.

1: draw the outline of the missing handle: either from manufacturers’ images you have found on the internet or from your best recollection of the shape.
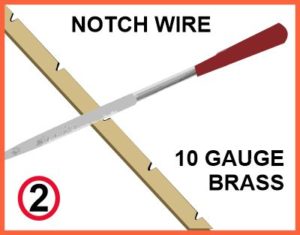
2: Using stiff wire (we recommend 10-gauge brass), file small V-shaped cutouts. These are optional but will help the epoxy to attach firmly to the wire.
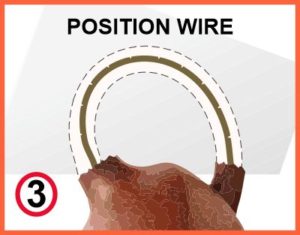
3: Use the traced outline of the handle to bend the wire into the correct curvature and position it on the teapot.

4: Attach the wire to the teapot using 2-part epoxy, dribbled down from above to connect the wire to the china (be sure to clean all surfaces before gluing).
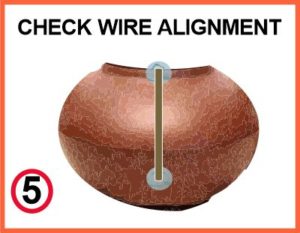
5: Take a look from the side to make sure your wire armature is perfectly plumb and aligned correctly. Adjust the wire before the glue hardens.

6: Let patience be your watchword when doing repairs. Most epoxies take at least 12 hours to achieve full strength – so leave your handle overnight to set up.
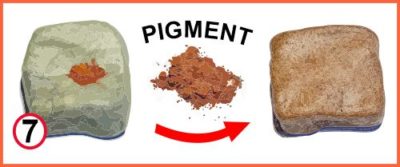
7: Mix 2-part epoxy putty (we recommend Epoxie Sculpt available here on Amazon) and tint it to the color of the teapot using dry pigment. Use just enough to achieve the correct tint – too much will weaken the setting characteristics and degrade the putty. Note that you can use colored pastel chalks instead of artist’s pigments. (Tinting is optional – the alternative is to use the natural color and paint the handle later.) For everything you need to know about epoxy putty follow this link.

Taking suitably sized strips of putty, attach them on to the wire armature until you have built up the shape of the handle. As the putty begins to harden (after 30 minutes or so) continue to mold it to get as close to the true shape as possible.

You can use a razor blade to pare away excess material as the putty hardens, and water to smooth the finish. The closer you get to the true shape at this stage – the less sanding you will need to do after the putty is dry.
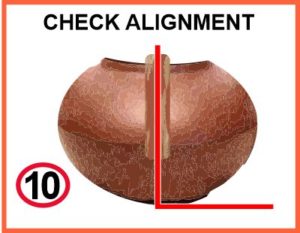
Before leaving the putty to set up, carefully check, from the back of the handle, to make sure it is aligned correctly.

Leave your new handle to completely cure overnight and finish by sanding and polishing with 200-grit to 1000-grit sandpaper.
If you did not tint the putty, the final stage in the restoration of an antique teapot will be to paint the handle to match the pot. See this post for painting instructions.
After completing these steps successfully, your restored teapot will be ready to brew your favorite cup of Earl Grey tea. Of course, be careful to clean the teapot only by hand and do not use abrasives on the repaired handle.
What to do about a broken or missing teapot lid
Teapot lids often get lost during moving or broken due to carelessness: if your favorite teapot has a missing or broken lid, here is what to do:
If the lid is broken, clean the pieces carefully and glue them together using use 2-part epoxy adhesive. If the lid is missing, search an online replacement service or commission a pottery studio to make you a new one.
China teapot lids are vulnerable because they are not attached and so may crash to the tiled floor while you are tilting the pot to pour out that last drop of fragrant Orange Pekoe tea. Other lids are damaged by mishandling during inspection in an antique store. Whatever the cause, several solutions are available including searching for a replacement on sites like Replacements Inc. or by purchasing from a replacement lid site (Google “teapot replacement parts” to find many options).
What to do about a broken teapot lid

If the lid is broken, follow the china repair steps outlined in “how to repair a china plate”. Make sure, in summary, to thoroughly clean the broken lid and devise a resting place so that the epoxy can set up and pieces remain in place under gravity.
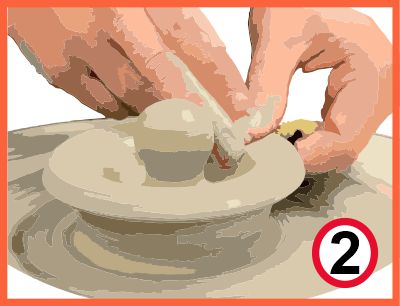
If the lid is lost and no ready-made replacement is available you will need to have one made either by conventional pottery methods (above) or by casting one out of epoxy putty (consult Artistry in Glass for details).
After gluing your teapot lid, there may still be minor chips or imperfections that need to be fixed. Use the steps outlined in our post about fixing china plates to complete the repair.
How to fix a leaking teapot
A very annoying problem to befall a beloved teapot is when it develops a slow leak or dribble. This is most common in earthenware pots where hairline cracks develop due to minor impacts.
To fix a stubborn leak, use transparent DAP silicone adhesive which is microwave, dishwasher-safe, and non-toxic. Squidge the DAP adhesive firmly into the crack from both sides, wipe off the excess, allow it to dry overnight, and get ready for a refreshing cup of tea.
We normally recommend that customers replace a leaking pot but, if you are particularly fond of it, special gluing can sometimes be effective. Epoxy is not food-safe so our best recommendation is clear, transparent DAP silicone adhesive which is microwave and dishwasher-safe and non-toxic.
First, fill the pot with water and examine it closely to find the exact source of the leak. This is almost always a hairline crack but sometimes may be so fine as to be invisible to the naked eye.
Allow the teapot to dry completely then apply the DAP adhesive firmly into the crack from inside and outside of the pot and wipe off the excess. Tighten the crack if possible by applying a tourniquet or using strong duct tape (always avoid sticking tape onto gilding – it will likely remove the gold).
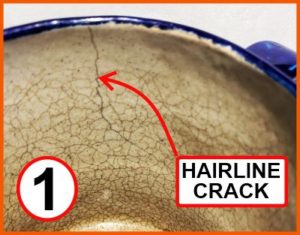
Hairline crack in crazed earthenware teapot. The crazing occurs in the surface glazed layer but the crack goes right through.
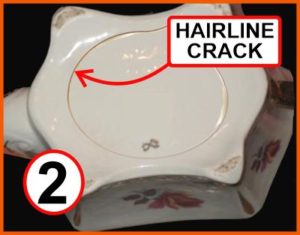
Semi-circular “sprung” crack in the base of a china teapot. Caused by the release of stress frozen into the ceramic during firing.
Leave the DAP to set up overnight and test for leaks. It may be necessary to repeat the gluing if a small leak is still present.
Summary & Conclusions
Teapot repair can be time-consuming and difficult but it is well worth doing if you have a special affection for your particular pot. If you lack confidence, feel free to consult the repair experts at Artistry in Glass in Tucson. If all else fails, search for a replacement from one of many internet resources.
Check out the other items restored by Artistry in Glass!
Unique Mirror Resources from Artistry in Glass
Mirror Design & layout
- How are mirrors made?
- What is a beveled mirror?
- What is a two-way mirror?
- Best mirrors for bedrooms
- How to size and position your wall mirror
- How to order custom etched mirrors
- Best places to hang dining room mirrors
- How much do wall mirrors cost?
- Shop the MIRROR Family Package
Mirror Installation & Removal
- How to hang a wall mirror
- How to frame a builder’s grade bathroom mirror
- How to hang a frameless mirror with glue
- Best clips for hanging mirrors
- How to attach a mirror to a closet door
- How to remove a mirror glued to the wall
Mirror Repair & Restoration
- Should I resilver my antique mirror?
- Can I repair scratched mirror silvering?
- What is the best spray paint for mirror silvering?
- How to fix a cracked mirror
- How to repair a broken mirror frame
Artistry in Glass was your source for antique repair in Tucson
Check out this amazing selection of informative articles:-
- Where can I get antiques repaired?
- Are broken antiques worth fixing?
- How to fix a broken picture frame
- How to repair a broken china plate
- How to repair a broken china teapot
- How to fix a broken marble slab
- How to repair a broken china coffee mug
- How to repair a 2000-year-old sculpture
- All about repairing stained-glass lampshades
- How to care for your stained glass skylight
- How to repair Dalle de Verre
- Is stained glass worth repairing?
- To repair or toss out?
- Tucson crystal & china repair a division of Artistry in Glass
- What to do with broken antiques
- Is lead crystal dangerous?
- Repairing an antique Mexican statue
- Repairing religious statues
- The history of Swarovski crystal figurines
- How to find the value of a Swarovski Crystal figurine
- Have Swarovski crystal figurines lost value since 2009?
- How to collect Swarovski annual ornaments
- How to display Swarovski crystal figurines
- How to authenticate a Swarovski crystal figurine
- How to display Swarovski annual ornaments
- How to clean Swarovski crystal figurines
- How to repair a Swarovski crystal mouse
- How to repair a Swarovski annual ornament
- How to repair a Swarovski crystal train set
- Fixing broken wine glass stems
- How to clean cloudy glasses
- Why do wine glasses have stems?
- Swarovski Crystal Figurines
- How to repair a chip in a wine glass
- How to fix a scratched glass tabletop
- How to replace a broken patio tabletop
We are a participant in the Amazon Services LLC Associates Program, an affiliate advertising program designed to provide a means for us to earn fees by linking to Amazon.com and affiliated sites.

